Installation
This guide covers importing VROcean into your Unity project and verifying the installation.
Requirements
Before installing VROcean, ensure your project meets these requirements:
| Requirement | Recommended |
|---|---|
| Unity | 6000.0.58f2+ |
| Render Pipeline | URP 17.0+ |
| Burst | 1.8.0+ |
| Collections | 2.1.0 |
| Mathematics | 1.3.0+ |
| XR Interaction Toolkit | 3.1.0+ |
| OpenXR Plugin | 1.15.0+ |
VROcean requires the Universal Render Pipeline (URP). It is not compatible with the Built-in Render Pipeline or HDRP.
Step 1: Import the Package
From Unity Asset Store
- Open the Unity Asset Store in your browser or via
Window > Asset Store - Purchase or download VROcean
- In Unity, open
Window > Package Manager - Select
My Assetsfrom the dropdown - Find VROcean and click
Import - Import all files when prompted
From .unitypackage File
- In Unity, go to
Assets > Import Package > Custom Package - Navigate to the downloaded
VROcean.unitypackagefile - Click
Open - Import all files when prompted
Step 2: Install Dependencies
VROcean depends on Unity's DOTS packages. If they are not already installed, add them via Package Manager:
- Open
Window > Package Manager - Click the
+button and selectAdd package by name - Add each of the following packages:
com.unity.burst
com.unity.collections
com.unity.mathematics
Alternatively, add them directly to your Packages/manifest.json:
{
  "dependencies": {
    "com.unity.burst": "1.8.8",
    "com.unity.collections": "2.2.0",
    "com.unity.mathematics": "1.3.1",
    "com.unity.render-pipelines.universal": "14.0.8"
  }
}
Step 3: Welcome Window
After importing, the VROcean Welcome Window appears automatically.
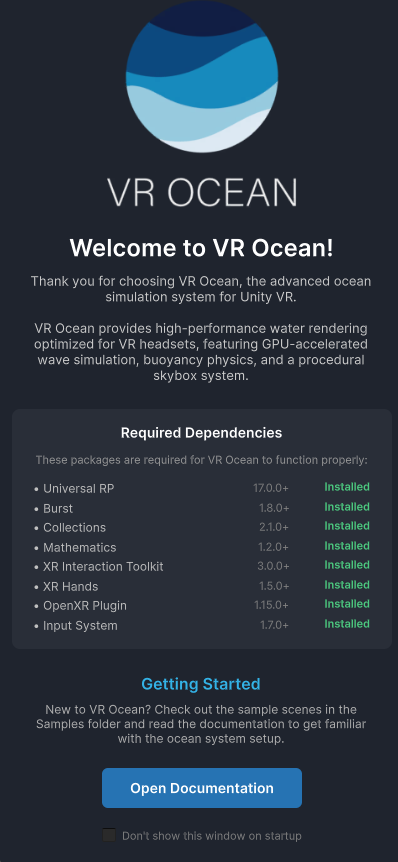 The Welcome Window provides quick access to documentation and sample scenes
The Welcome Window offers:
- Links to documentation and support
- Quick setup options
- Sample scene access
If the window does not appear, open it manually via Window > VROcean > Welcome.
Step 4: Verify Installation
Confirm that VROcean is installed correctly:
- Check that the
PlatypusIdeasfolder exists in your Project window underAssets - Verify no console errors related to missing dependencies
- Confirm the VROcean menu appears under
Window > VROcean
Namespace Check
You can verify the installation in code by checking if the namespace resolves:
using PlatypusIdeas.VROcean.Runtime.Scripts.Scene;
using PlatypusIdeas.VROcean.Runtime.Scripts.Ocean;
using PlatypusIdeas.VROcean.Runtime.Scripts.Physics;
If these namespaces resolve without errors, the installation is complete.
Folder Structure
After installation, VROcean creates the following structure:
Assets/
└── PlatypusIdeas/
    └── VROcean/
        ├── Runtime/
        │   ├── Scripts/
        │   │   ├── Core/           # Singleton base class
        │   │   ├── IDs/            # Shader property IDs
        │   │   ├── Jobs/           # Burst-compiled jobs
        │   │   ├── Math/           # Complex and surface math
        │   │   ├── Ocean/          # Simulator and renderer
        │   │   ├── Physics/        # Buoyancy components
        │   │   ├── Rendering/      # Reflection probe
        │   │   └── Scene/          # SceneSystem
        │   ├── Shaders/            # Ocean and skybox shaders
        │   ├── Materials/          # Default materials
        │   └── Profiles/           # Example biome profiles
        ├── Editor/
        │   └── Scripts/            # Welcome window, tools
        └── Samples/                # Example scenes
Troubleshooting Installation
Missing Burst Package
Error: The type or namespace name 'Burst' could not be found
Solution: Install the Burst package via Package Manager or manifest.json as described in Step 2.
Shader Errors
Error: Shader error in 'Custom/FFTOceanURP_VR': undeclared identifier
Solution: Ensure URP is installed and configured. VROcean shaders require URP shader libraries.
Pink Materials
Symptom: Ocean surface appears pink/magenta
Solution:
- Verify URP is the active render pipeline in
Edit > Project Settings > Graphics - Reimport the VROcean shaders by right-clicking the Shaders folder and selecting
Reimport
Script Compilation Errors
Error: Errors referencing NativeArray or float3
Solution: Install the Collections and Mathematics packages as described in Step 2.
Next Steps
With VROcean installed, proceed to Quick Setup to create your first ocean scene.